
ZoneLab User Guide
Zone System Testing & Film Process Documentation for macOS
Getting Started
What is ZoneLab?
ZoneLab started as a deeply nerdy personal project to take a lot of my old school chemical photographic knowledge and bring it into the digital age. The goal was to systematically document, chart and analyze my film and developer combinations by measuring the tangible effects of pushing, pulling, over and under exposing and contrast compression across different film stocks.
As I shared early screen shots and testing results with some of my other photo nerd friends, I was asked quite often if I would ever consider making this into a desktop app that others could use.
So sure, why not? I set out to make this an app to help film photographers log and chart the effective ISO of their specific film and development processes through Zone System testing methodology, and I've since started on the base of a larger goal: a complete suite of tools for the modern film heads.
So this is the point where you might be asking yourself: "Will the zone system make me a better photographer?"
No.
But what ZoneLab can do is help you establish a consistent, repeatable process with as many variables as possible being controlled or eliminated. By shooting a 10-stop wedge test and measuring the resulting film densities, ZoneLab logs your effective ISO, Contrast Index, Gamma, Tonal Range and Exposure Latitude—helping you build a reference library of how your particular processes perform under controlled conditions.
Important: ZoneLab logs the effective ISO your specific process produces through Zone System testing. This is not ISO 6:1993 laboratory film speed testing, which requires absolute lux-second measurements and toe-region analysis. ZoneLab is a practical documentation tool for establishing consistent, repeatable workflows where variables are controlled and results are tracked over time.
First Launch
When you first launch ZoneLab, a 5-step onboarding wizard helps you populate your equipment library before your first session. You can always add more later — this just gets your most-used gear in place quickly.
Step 1 — Select Your Films
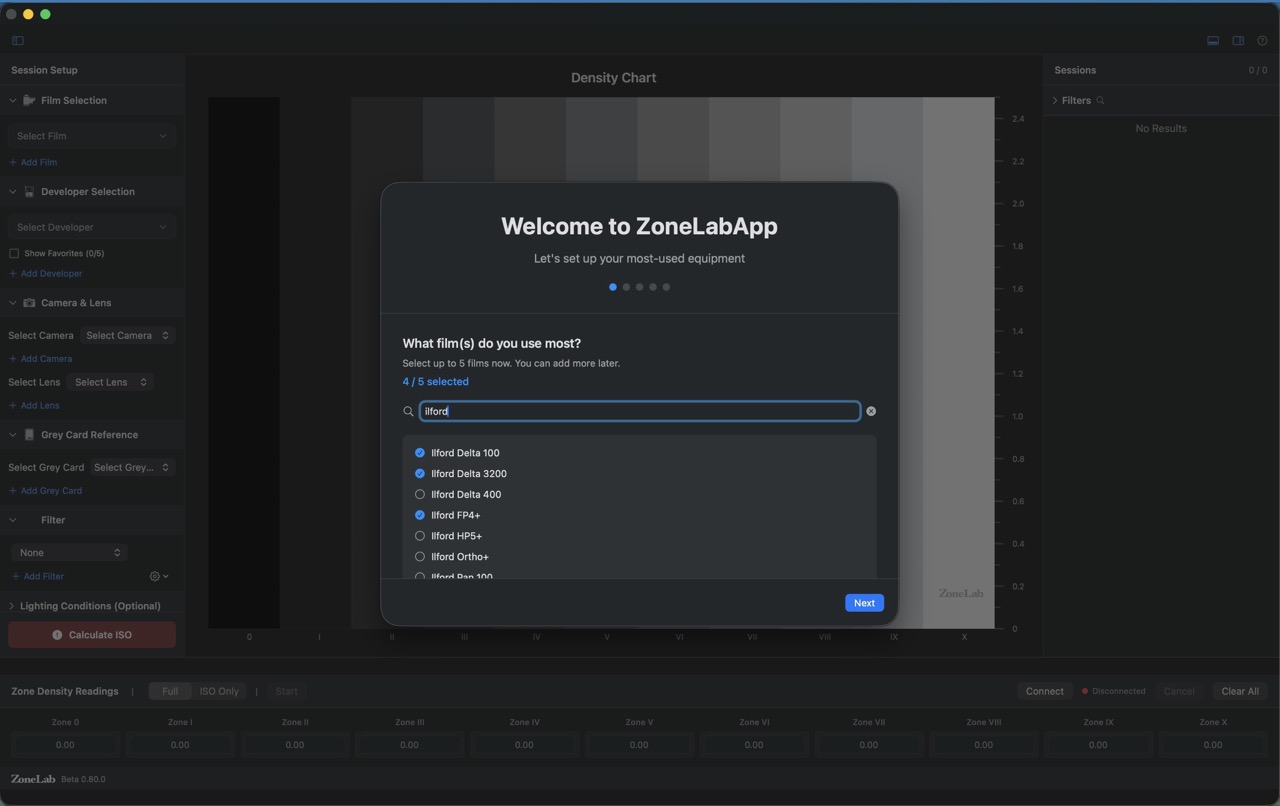
- 1 The progress indicator shows which of the 5 setup steps you're on.
- 2 Type in the search field to filter the full film catalog by name or manufacturer.
- 3 Check up to 5 films. These become your favorites — they'll appear at the top of the film dropdown during every session.
- 4 The counter shows how many slots you've used (e.g., 4/5).
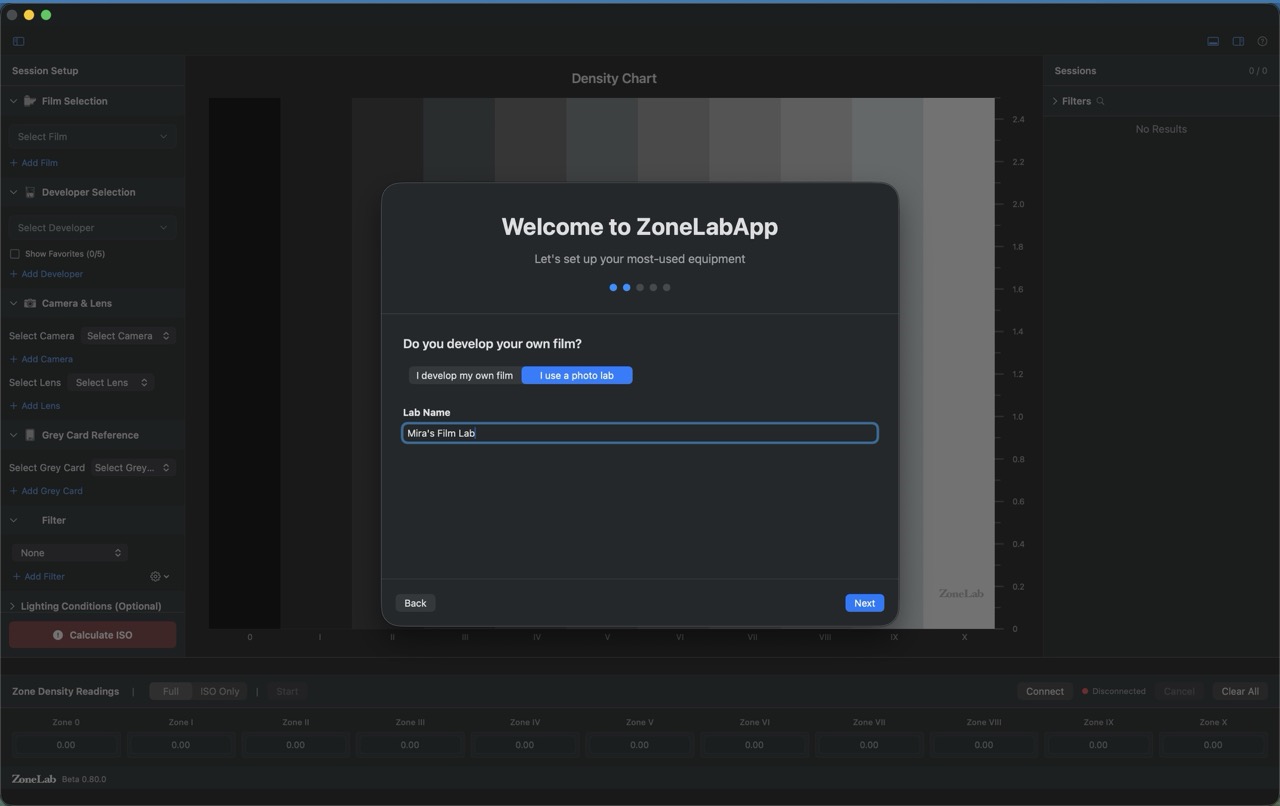
Step 2 — Developer Setup
ZoneLab needs to know whether you develop your own film or send it to a lab, because these paths work differently.
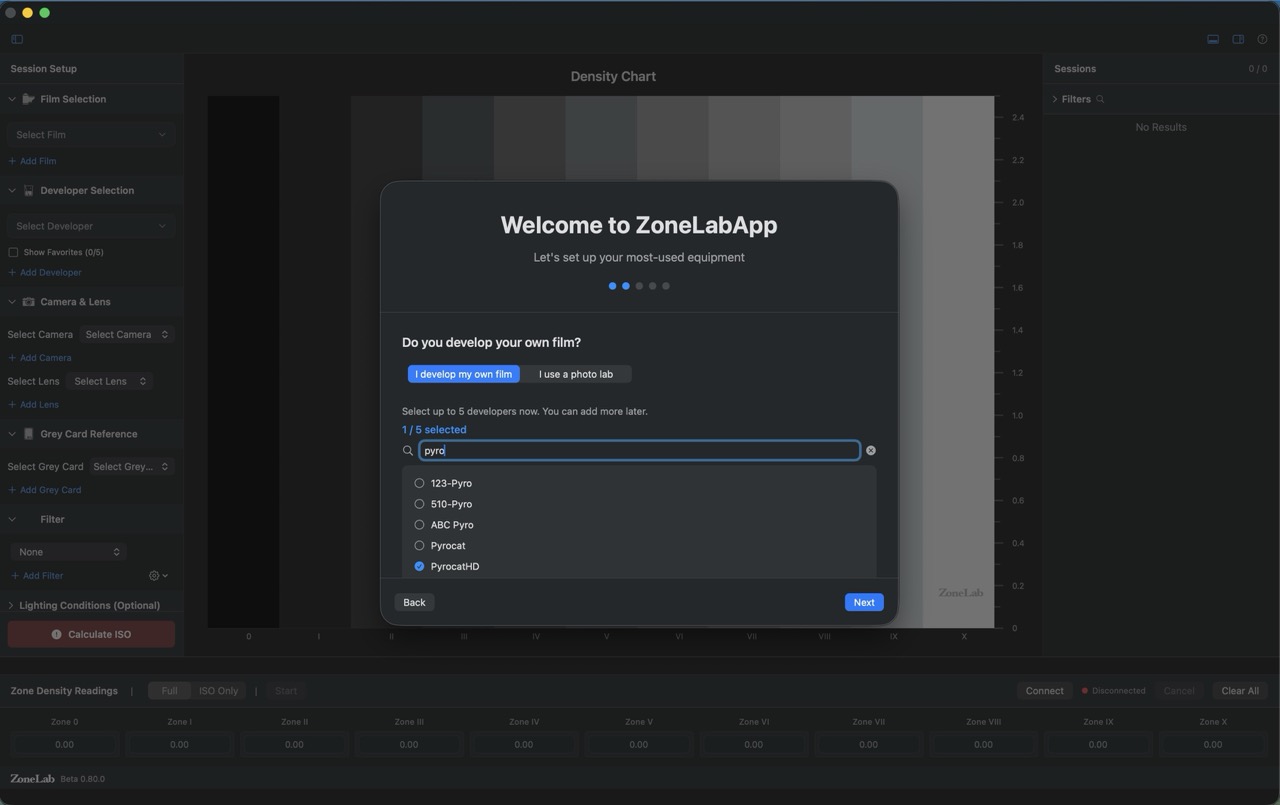
- 1 I develop my own film — search and select up to 5 developers (D-76, PyrocatHD, Rodinal, etc.) to add to your favorites.
- 2 I use a photo lab — enter your lab's name. This replaces the developer dropdown with a lab name field throughout the app.
Step 3 — Camera Setup
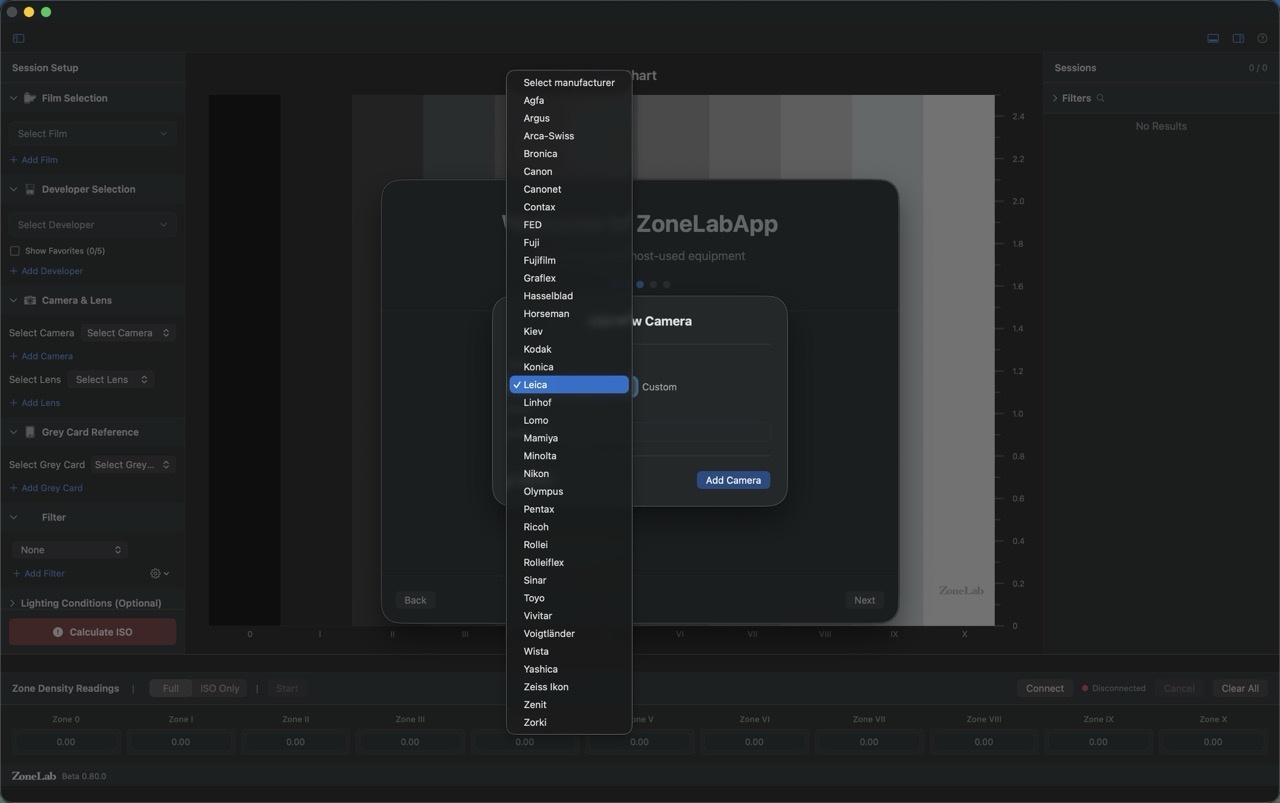
- 1 A manufacturer dropdown covers every major film camera brand (Agfa through Zeiss Ikon). Select the brand, then name the specific body.
- 2 Choose Custom at the bottom of the list for any brand not listed.
- 3 Click Add Camera to save it to your library.
Step 4 — Lens Setup
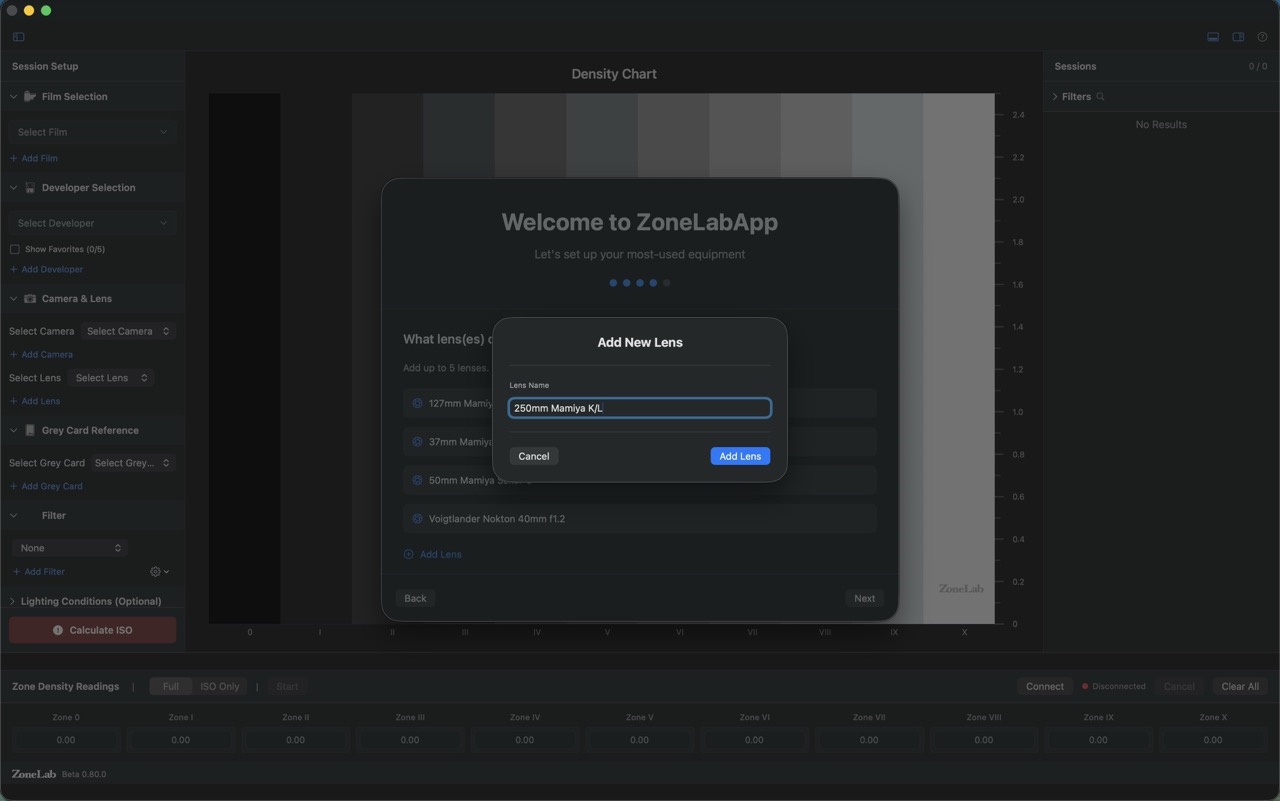
- 1 Previously added lenses are listed with checkboxes — select any you want to mark as favorites for quick access.
- 2 Click + Add Lens to open the name dialog. Enter the lens exactly as you want it displayed (e.g., "Voigtlander Nokton 40mm f1.2").
- 3 Lenses are free-text — name them however is most useful to you.
Step 5 — Grey Card Reference
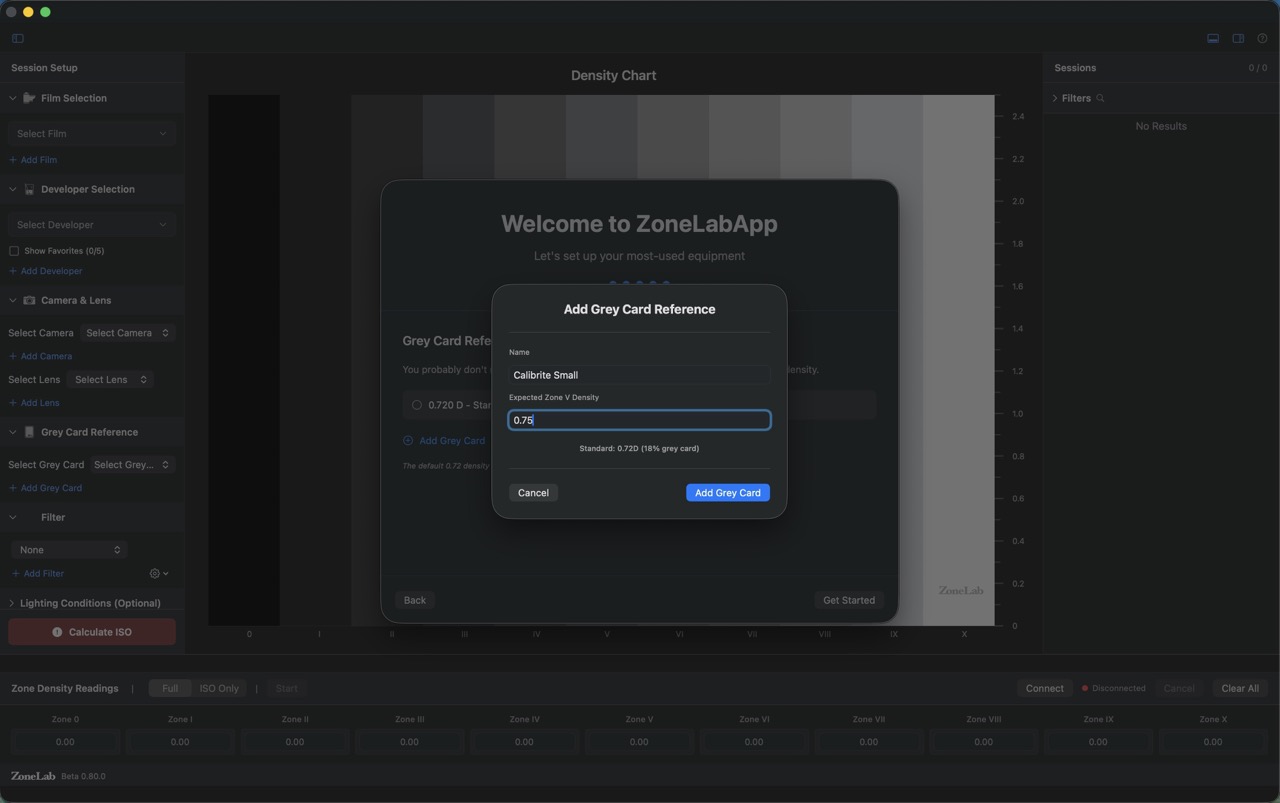
- 1 Give the card a descriptive name (e.g., "Calibrite Small", "Kodak Grey Card").
- 2 Expected Zone V Density — the density value your card should produce when properly exposed and developed. The standard 18% grey card targets 0.720. If you've measured your specific card and it differs, enter that value here.
- 3 This value is used as the grey target in all ISO calculations. If you're unsure, leave it at 0.720.
System Requirements
- macOS 14.0 (Sonoma) or later
- Apple Silicon (M1/M2/M3/M4) or Intel Mac
- Calibrated transmission densitometer (any brand), or use a photo lab service
- Optional: Printalyzer UV Densitometer for direct USB integration
Testing Modes
ZoneLab offers two testing modes to suit different needs:
Full Mode
Complete 11-zone analysis with all metrics for full process documentation.
Use Full Mode when you want to:
- Analyze the complete characteristic curve of your film/developer combination
- Calculate Contrast Index (CI), Gamma, Gradient, Tonal Range, and Exposure Latitude
- Use gradient-adjusted Effective ISO calculations
- Compare how different developers affect contrast rendering
- Document complete curve characteristics for process control
Requirements:
- 10-stop wedge test (Zones I-X) plus Zone 0 (base + fog)
- Density measurements for all 11 zones
- Each zone represents one stop of exposure difference (0.30 log-H units)
EI Only Mode
Single Zone V measurement for fast effective ISO testing without full metrics.
Use EI Only Mode when you want to:
- Quickly verify your effective ISO for a film/developer combination
- Test a new film stock without full analysis
- Confirm ISO consistency for a familiar process
- Save time when you don't need full curve data
Requirements:
- Single Zone V exposure (metered 18% grey card)
- One density measurement only
- Faster workflow, effective ISO only (no CI/Gamma)
Tip: Toggle between modes using the segmented picker in the zone input panel. The mode setting only affects new sessions - existing sessions retain their original mode.
Basic Workflow
Process Control: The key to meaningful results is consistency. Use the same equipment, lighting setup, and development parameters each time you test. ZoneLab helps you document these variables so you can identify what changes between sessions and maintain repeatable results.
Step 1: Set Up Equipment
The left sidebar is your session control panel. Every field you fill in here gets saved with the session — so future you can filter, compare, and understand exactly what produced any given result.
Selecting Film
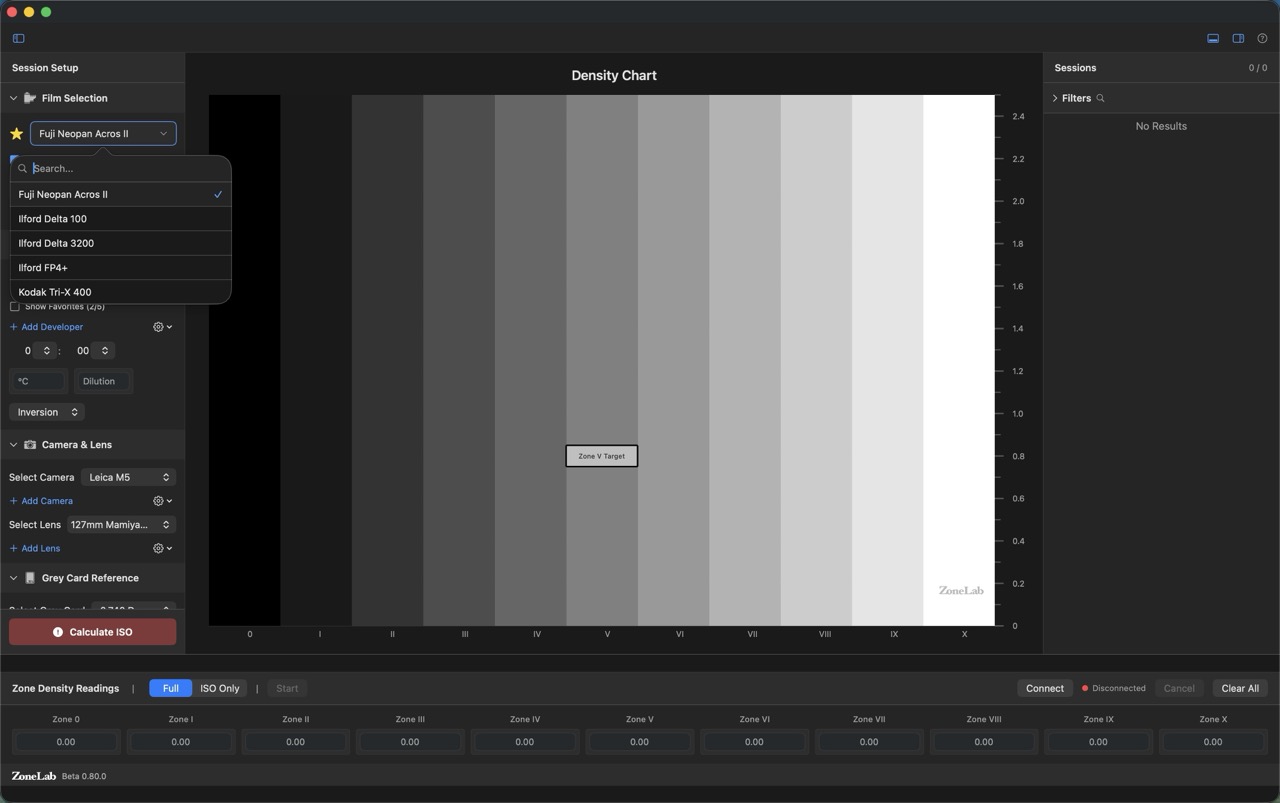
- 1 The star icon next to a film name means it's a favorite. Starred films appear at the top of the list for quick access.
- 2 Enable Show Favorites to collapse the list to only your starred films — useful when you have a large catalog.
- 3 The ISO field below the film dropdown shows your metered ISO — the speed you set on your meter when you shot the test. This is usually the film's box speed.
- 4 Click + Add Film to add a new stock to your library at any time.
Selecting Developer
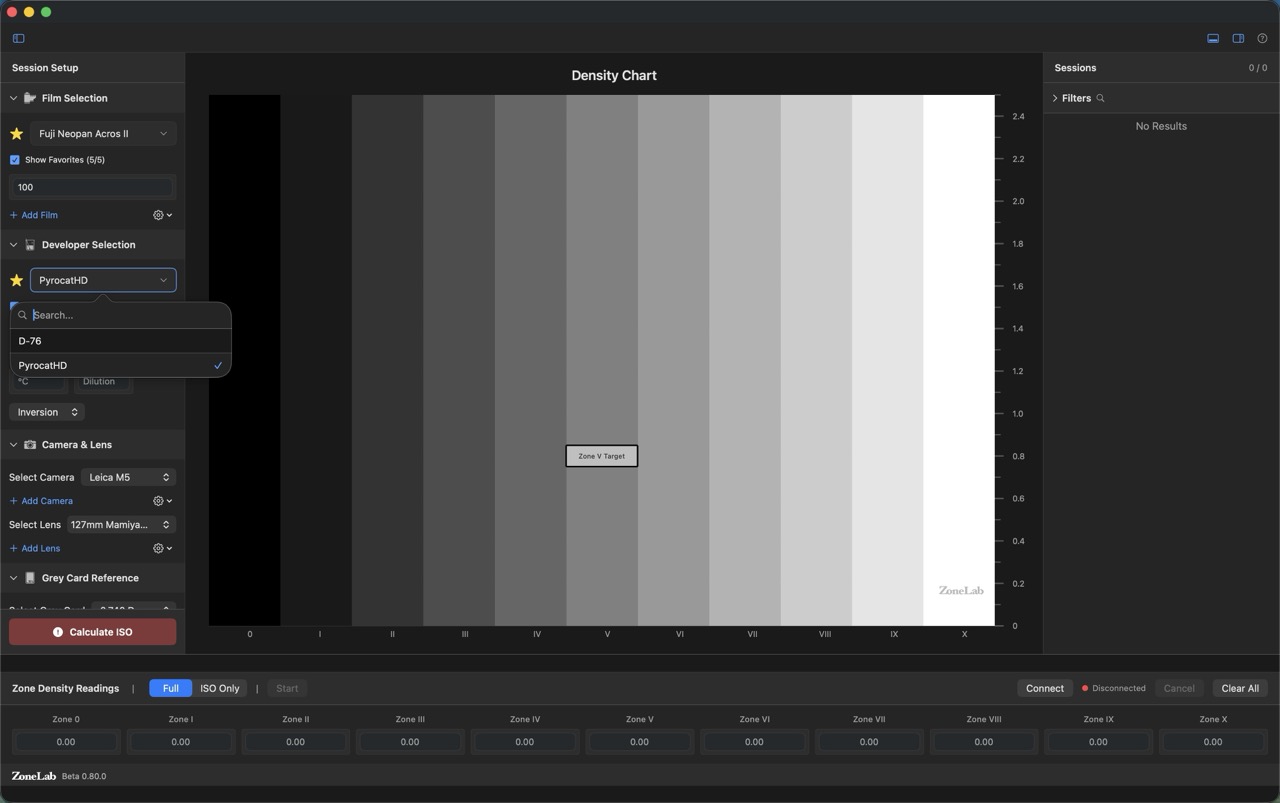
- 1 Select your developer from the dropdown. The same favorites/search system applies as with films.
- 2 Enter Temperature (°C), Time (minutes : seconds), Dilution, and Agitation method. These parameters are logged with every session.
- 3 The Inversion toggle captures your agitation scheme (constant, interval, etc.).
Lighting Conditions & Notes
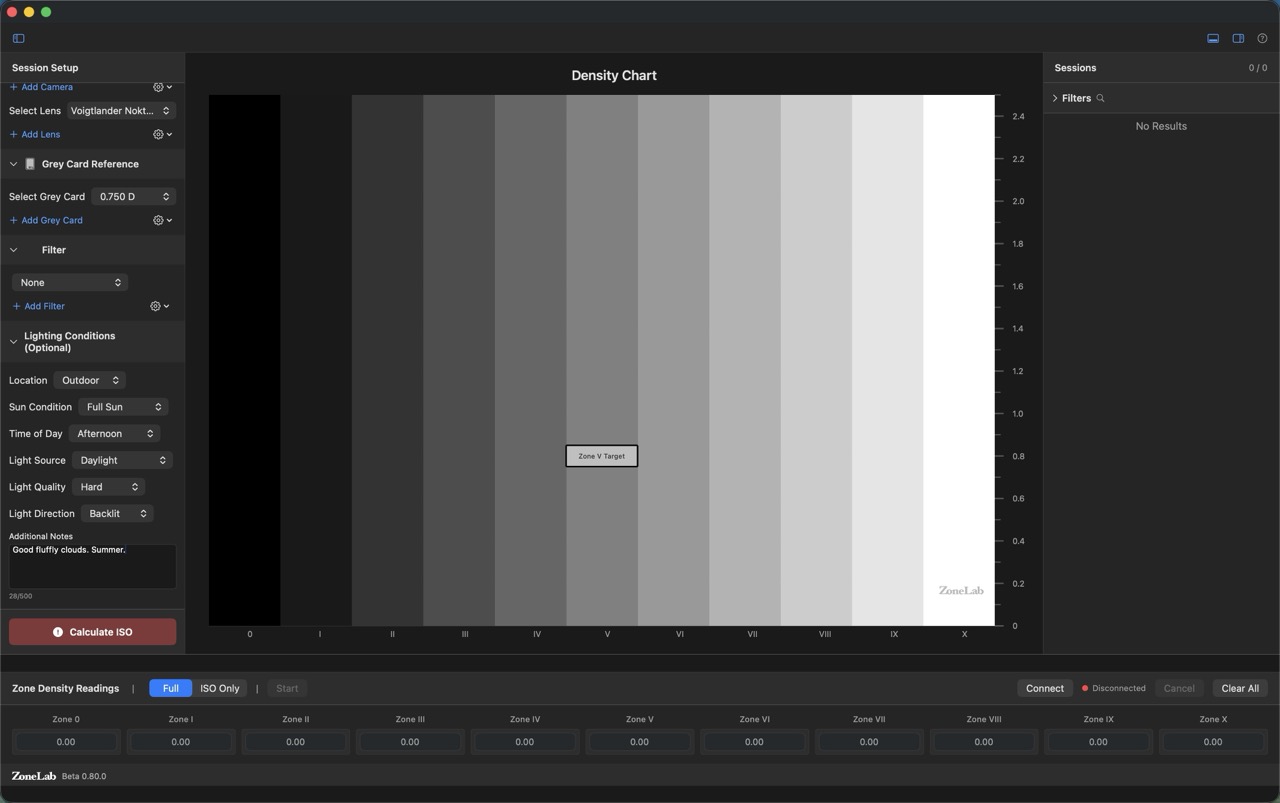
- 1 Lighting conditions are optional but valuable for outdoor testing where light quality varies. Fields include: Location, Sun Condition, Time of Day, Light Source, Light Quality, and Light Direction.
- 2 Additional Notes is a free-text field (up to 500 characters). Use it to capture anything the structured fields don't cover — subject matter, anomalies, observations about the development, etc.
- 3 The character counter at the bottom-left shows how much of the 500-character limit you've used.
Validation — Missing Fields
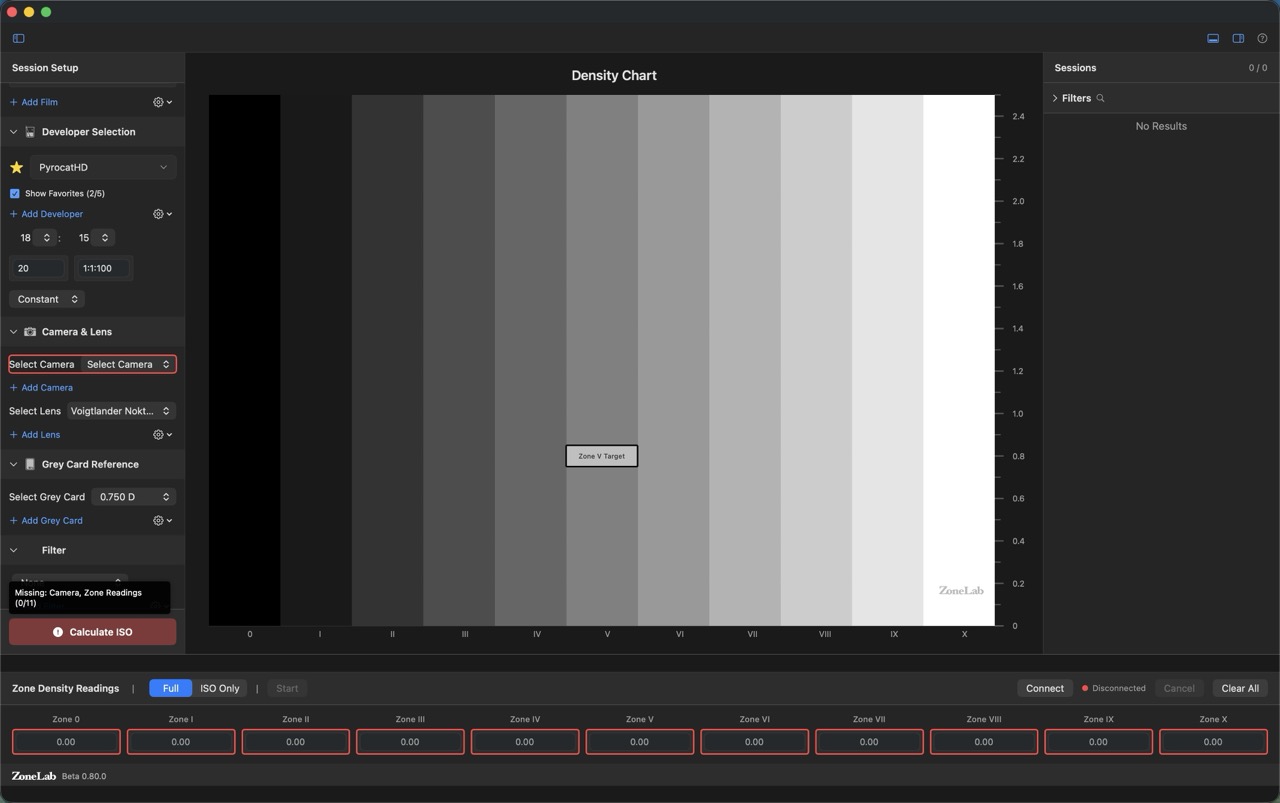
- 1 If you try to calculate without all required fields, the missing fields are outlined in red. Here the Camera field is missing.
- 2 A summary at the bottom of the sidebar lists exactly what's missing (e.g., "Missing: Camera, Zone Readings (0/11)") so you don't have to hunt for it.
- 3 Zone reading fields also turn red when empty, showing at a glance how many readings still need to be entered.
Step 2: Shoot Your Test
For Full Mode (10-Stop Wedge Test):
- Set up your 18% grey card with even, consistent lighting
- Meter the grey card at the film's box speed ISO to determine your base exposure (Zone V)
- Shoot 10 frames with one-stop increments:
- Zone I: Base exposure -4 stops
- Zone II: Base exposure -3 stops
- Zone III: Base exposure -2 stops
- Zone IV: Base exposure -1 stop
- Zone V: Base exposure (metered grey card)
- Zone VI: Base exposure +1 stop
- Zone VII: Base exposure +2 stops
- Zone VIII: Base exposure +3 stops
- Zone IX: Base exposure +4 stops
- Zone X: Base exposure +5 stops
- After development, measure Zone 0 (base + fog) on an unexposed portion of the film
Note: Zone 0 is base + fog density (unexposed, processed film). You don't shoot a frame for Zone 0—simply measure an unexposed edge or leader after development. This is a 10-stop wedge test, not 11 exposures.
For EI Only Mode:
- Set up your 18% grey card with even lighting
- Meter the grey card at the film's box speed ISO
- Shoot one frame at the metered exposure (Zone V)
- After development, measure the Zone V density to calculate effective ISO
Step 3: Develop Your Film
- Process the film with your chosen developer
- Maintain consistent temperature, time, and agitation (these are critical variables)
- Note all development parameters in ZoneLab
- Let the film dry completely before measuring
Consistency Tip: Even small variations in development (±0.5°C, ±30 seconds) can affect your results. Document everything so you can replicate successful processes or identify what changed when results differ.
Step 4: Enter Density Readings
In the bottom zone input panel:
- Select your testing mode (Full or EI Only)
- Measure each zone with your calibrated densitometer
- Enter density values (typically 0.02 to 1.8):
- Full Mode: Enter all 11 readings from Zone 0 to Zone X
- EI Only Mode: Enter only Zone V reading
- Optional: Add lighting conditions and session notes (up to 500 characters)

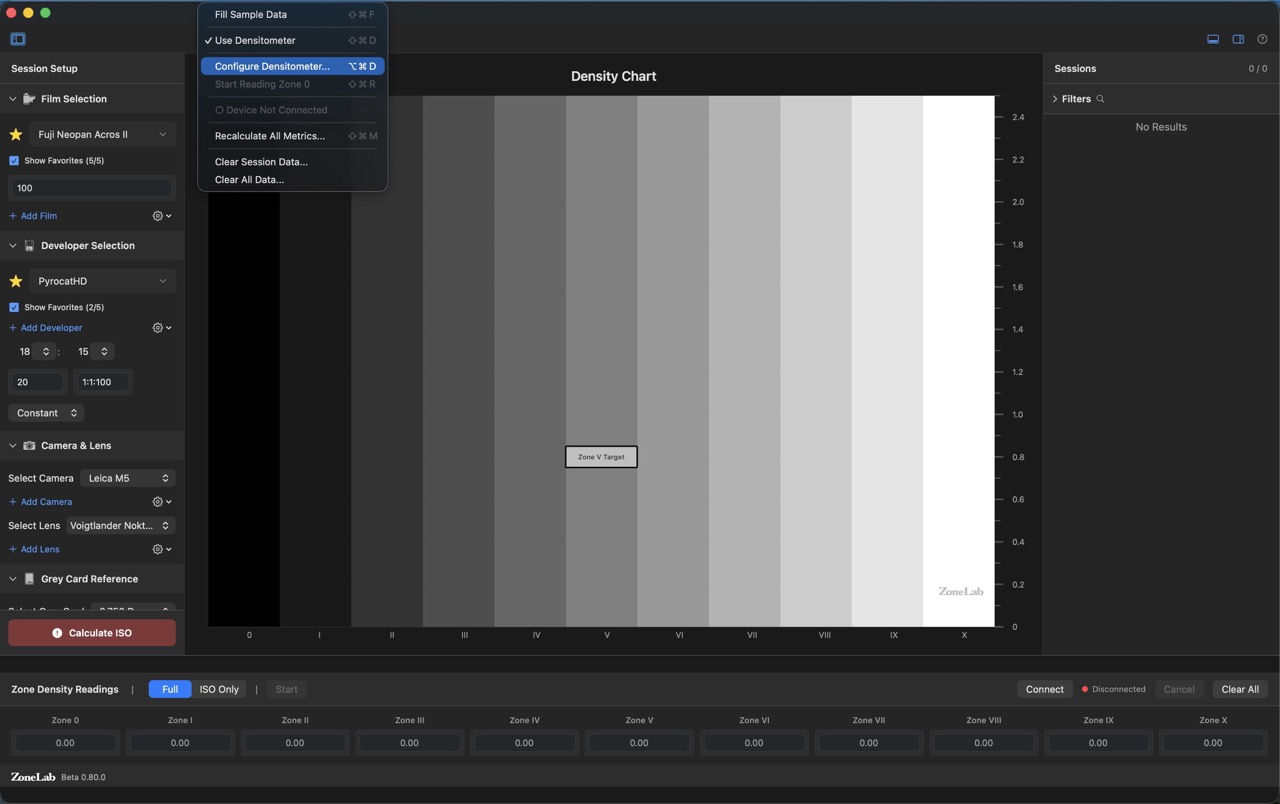
- 1 Fill Sample Data (⌘⇧F) — populates all zone fields with a realistic test dataset. Use this to explore the app before your first real test.
- 2 Use Densitometer (⌘⇧D) — toggle to enable direct USB input from a connected Printalyzer densitometer. When enabled, readings auto-advance through zones as you measure.
- 3 Configure Densitometer... (⌘⌥D) — opens device settings (model, reading type, auto-advance). See the Densitometer section below.
- 4 Start Reading Zone 0 (⌘⇧R) — begins a densitometer reading session. Grayed out until a device is connected.
- 5 Recalculate All Metrics (⌘⇧M) — re-runs calculations on all existing sessions. Useful after a ZoneLab update that changes calculation methods.
- 6 Clear Session Data — deletes all sessions while keeping your equipment library intact.
- 7 Clear All Data — full reset. Removes sessions and all equipment libraries.
Tip: In EI Only Mode, Fill Sample Data only populates Zone V — not all 11 zones. This is expected behavior.
Step 5: Calculate Effective ISO
- 1 Once all required fields and zone readings are complete, the Calculate EI button becomes active.
- 2 ZoneLab finds the zone closest to 0.72 density (18% grey target) and calculates your effective EI.
- 3 Full Mode sessions also calculate CI, Gamma, Gradient, Tonal Range, and Exposure Latitude.
- 4 The session is saved automatically with all data — it appears immediately in the Session Library on the right.
EI Only Mode sessions calculate effective ISO only. Full Mode sessions produce the complete set of metrics.
Step 6: Review Results
In the right sidebar (Session Library):
- View all your test sessions in chronological order
- See the calculated ISO and metrics (Full Mode only)
- Compare sessions on the interactive chart
- Filter by film, developer, camera, or lens
Equipment Library
Managing Your Equipment
ZoneLab maintains libraries for all your equipment. Add, edit, or delete items as needed.
Films
- Add films with manufacturer, name, and box speed
- Mark up to 5 films as favorites for quick access
- Common films (Tri-X, HP5+, etc.) are available by default
Developers
- Add developers with specific development parameters
- Track time, temperature, dilution, and agitation method
- Support for both self-development and lab processing
- Mark favorites for frequently-used developers
Cameras & Lenses
- Organize your camera bodies and lenses
- Track which equipment was used for each test
- Helps identify equipment-specific exposure variations
B&W Filters
- Track common B&W filters: Yellow #8, Orange #21, Red #25, Deep Red #29, Green #11, Blue #47, Polarizer
- Includes Wratten numbers, filter factors (e.g., 2×, 4×), and stop compensation (e.g., +1, +2)
- Add custom filters with your own specifications
- Filters stored as session metadata only - do not affect chart calculations
Grey Cards
- Document your reference grey cards
- Important for consistent, repeatable results
- Most users will have one primary grey card
Tip: Use the "Show Favorites" toggle to filter your equipment lists to just your most-used items.
Measuring Density Readings
Option 1: Photo Lab Service
Don't have a densitometer? Any quality photo lab can measure your film densities for you.
Using the Lab Form:
- Visit www.zonelab.app/lab_form.html
- Print the form to provide to your lab
- Bring your developed test film and the printed form to your lab
- The lab will measure and record density readings for each zone
- Enter the lab's readings into ZoneLab
Tip: Make sure your lab uses a calibrated transmission densitometer. Most professional labs have one and are familiar with sensitometric testing.
Option 2: Manual Entry (Your Own Densitometer)
ZoneLab works with any calibrated transmission densitometer:
- Measure each zone on your developed film
- Manually enter density readings in the zone input fields
- Readings typically range from 0.02 (clear film) to 2.5 (very dense)
- Maximum accepted density: 4.0 (readings above this will be rejected)
Printalyzer USB Integration
ZoneLab includes full support for the Printalyzer UV Densitometer via direct USB connection. When connected, the densitometer reads directly into the zone fields — no manual entry required.
Enabling the Densitometer
- 1 Open Input → Use Densitometer (⌘⇧D) to toggle USB reading on. A checkmark confirms it's active.
- 2 Open Input → Configure Densitometer... (⌘⌥D) to set up your specific device model and reading preferences.
- 3 Start Reading Zone 0 (⌘⇧R) is available once a device is connected. It begins the reading sequence at Zone 0 and advances automatically.
Configure Densitometer Dialog
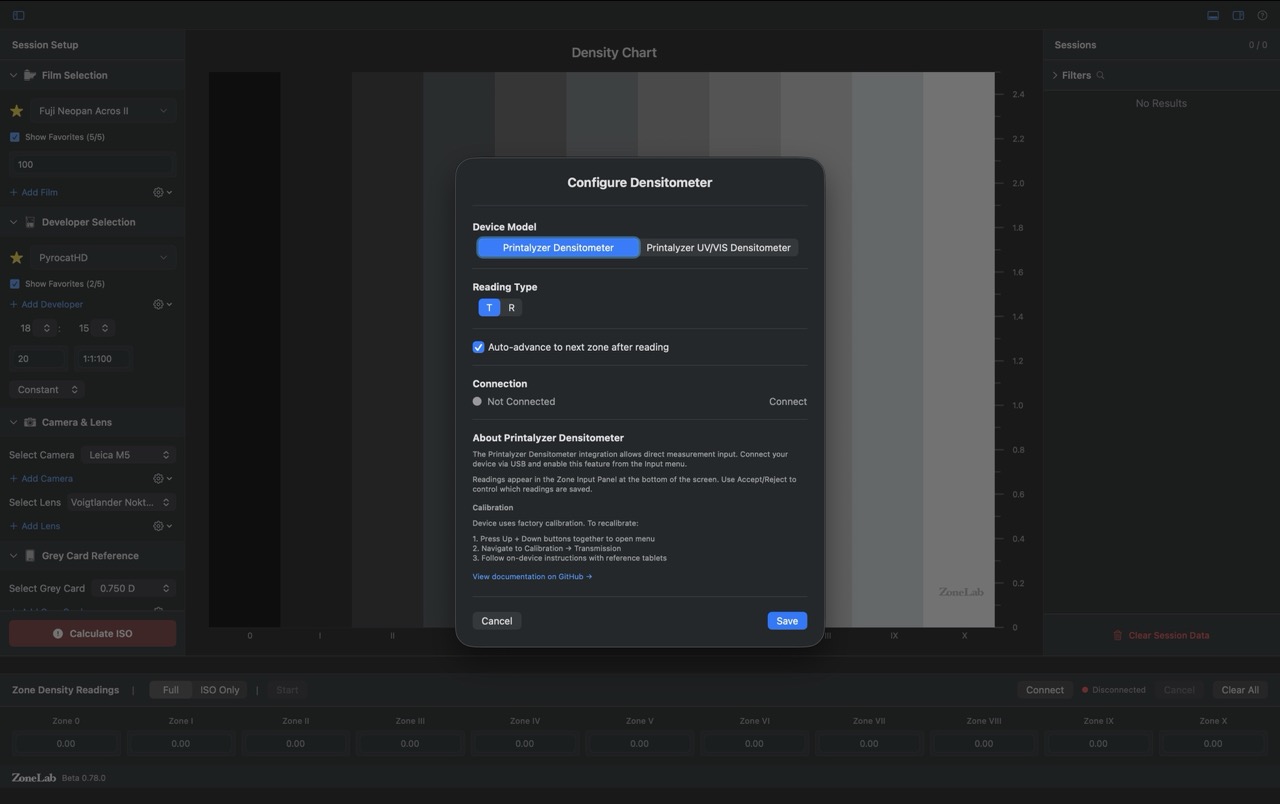
- 1 Device Model — choose between Printalyzer Densitometer (standard) and Printalyzer UVVIS Densitometer (UV/VIS version). Select the model that matches your hardware.
- 2 Reading Type — always use T (Transmission) for film density measurements. R (Reflection) is for print/paper testing only.
- 3 Auto-advance to next zone after reading — when enabled, ZoneLab moves to the next zone field automatically after each accepted reading. Keeps the workflow fast and hands-free.
- 4 Connection — shows current USB connection status. Click Connect to attempt device detection if it isn't found automatically.
- 5 Calibration — if readings seem off, recalibrate the device on-device: press Up + Down simultaneously to open the device menu, navigate to Calibration → Transmission, then follow the on-device instructions using the reference tablets shipped with your unit.
Using the Densitometer
- Full Mode: Click Start (or ⌘⇧R) to begin at Zone 0. Place the densitometer on each zone in sequence and accept or reject each reading. ZoneLab advances through all 11 zones automatically.
- EI Only Mode: The sequence begins and stops at Zone V. Only one reading is needed.
- Mode Detection: ZoneLab verifies the device is in Transmission (T) mode before accepting readings. If it detects Reflection mode, it will warn you.
- Connection Status: Real-time connection status is shown in both the Configure dialog and the zone input panel.
Note: USB integration uses IOKit for direct USB communication. Fully compatible with macOS App Sandbox.
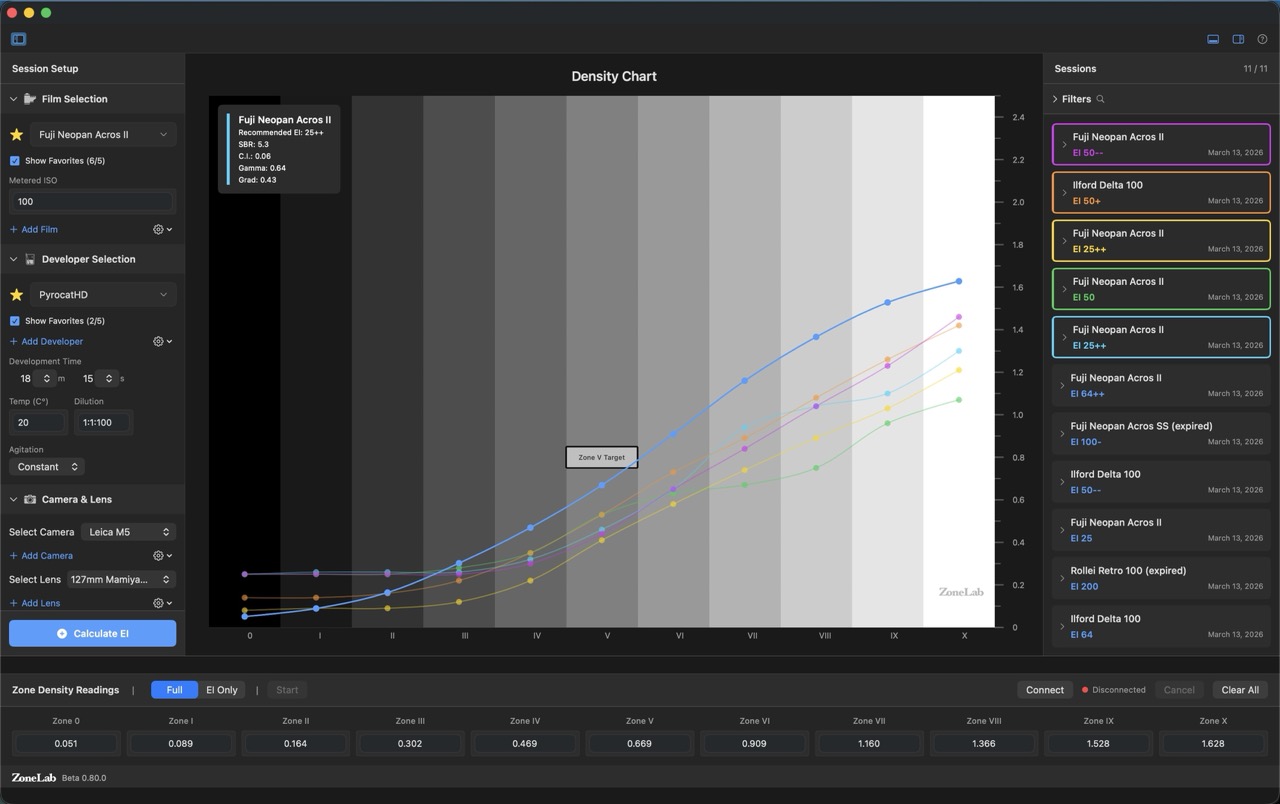
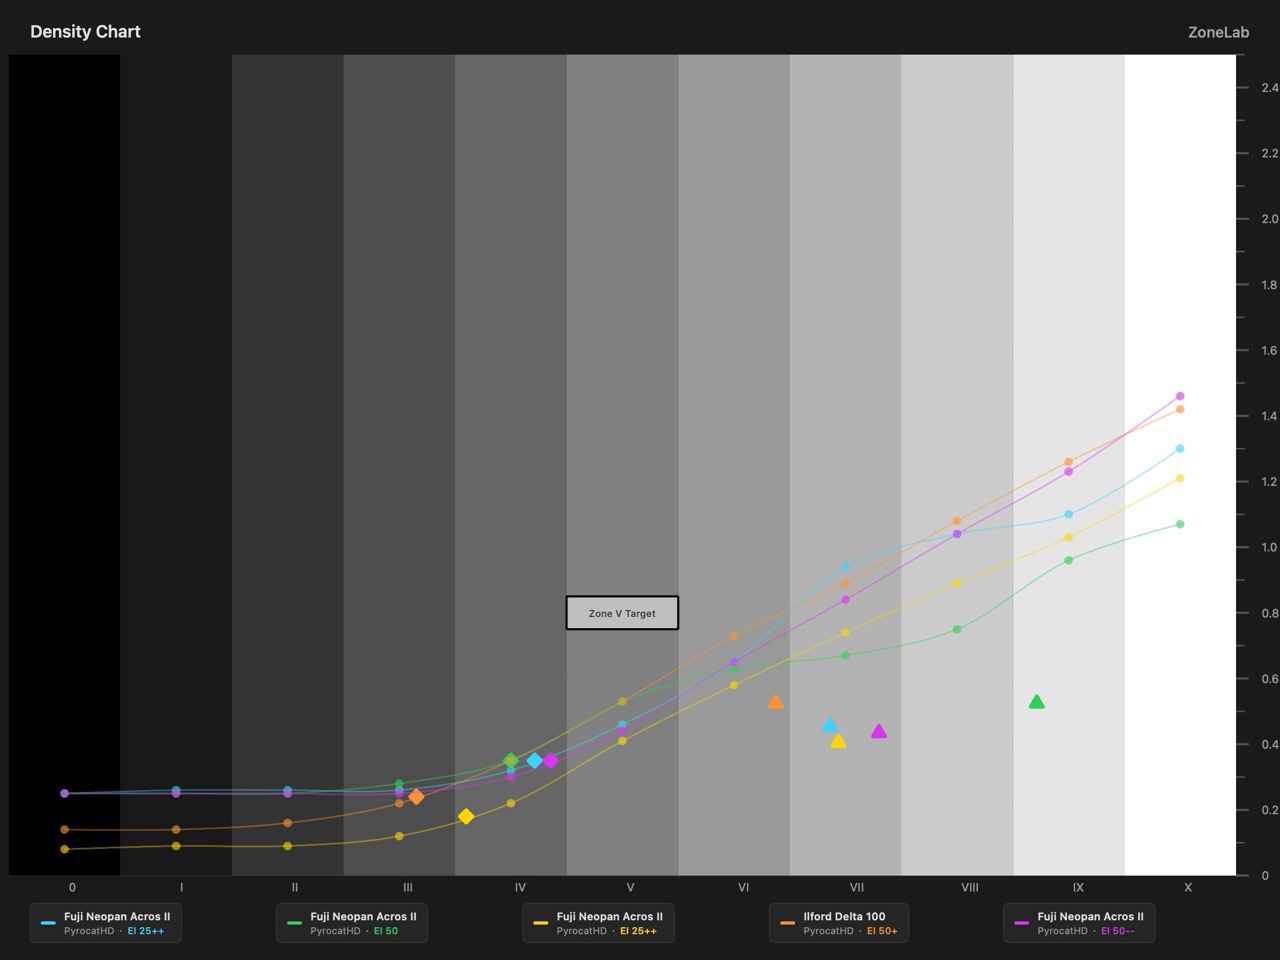
Session Comparison & The Chart
Comparing Sessions
Compare up to 5 sessions simultaneously to see how different variables affect your results. This is where ZoneLab's systematic approach shines: by changing one variable at a time (same film, different developer; same developer, different time), you can isolate what causes specific changes in your characteristic curves.

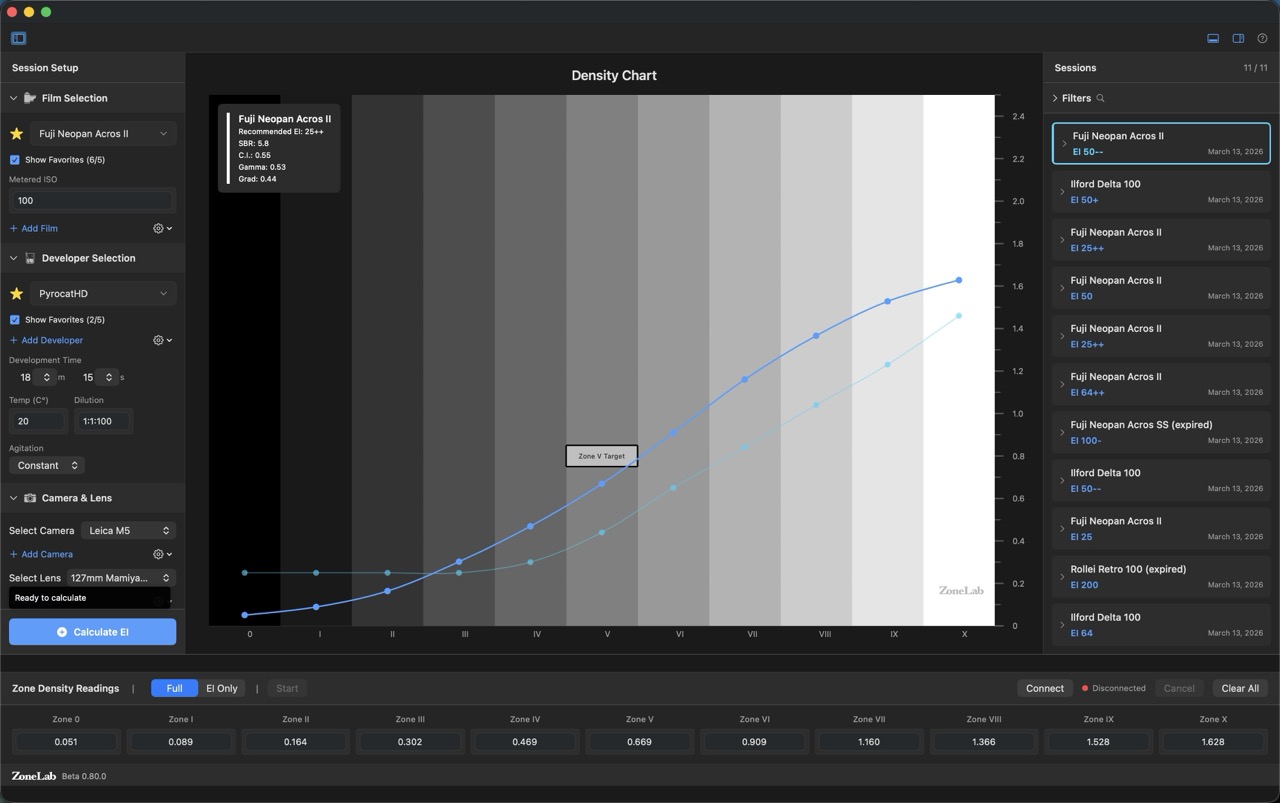
- 1 Each session is rendered in a unique color. The Session Library (right panel) shows a matching color swatch next to each session name.
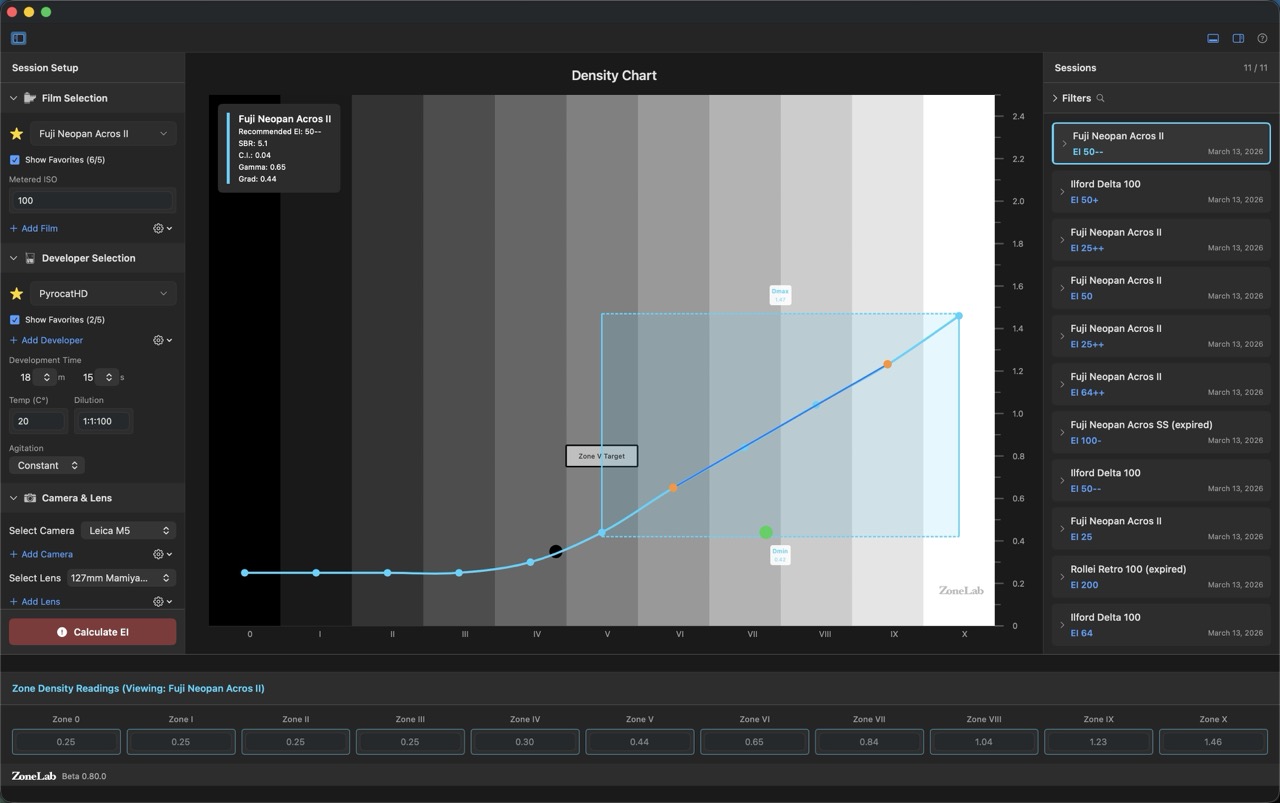
- 2 The chart's horizontal axis represents log exposure (logH), with each zone spaced 0.30 logH apart. Vertical axis shows density.
- 3 Zone bands run across the background as subtle grayscale strips — from Zone 0 (black) through Zone X (white) — giving you an instant tonal reference for every point on every curve.
- 4 The Zone V target box (dashed outline) marks 0.72 density at Zone V — the ideal 18% grey placement. Curves landing inside or near the box are properly calibrated.
Selection Methods:
- Click: Select a single session
- ⌘ + Click: Add/remove non-consecutive sessions
- ⇧ + Click: Select consecutive sessions
Hover Overlays & SBR
Hover over a session row in the Session Library (or over a curve on the chart) to see detailed overlays for that session.
- 1 The SBR arc spans the density range a "normal" scene would produce on this film/developer. It gives a quick read of where your process places a standard subject.
- 2 A ◆ diamond marker shows where the Speed Point EI falls on the curve (B+F + 0.1 density method — shadow toe).
- 3 A ▲ triangle marker shows where the Zone V EI falls on the curve (midtone 0.72D method).
- 4 An info card in the upper-left of the chart shows the session's film name, Recommended EI, CI, Gamma, and Tonal Range for quick reference.
Expanded Session Panel
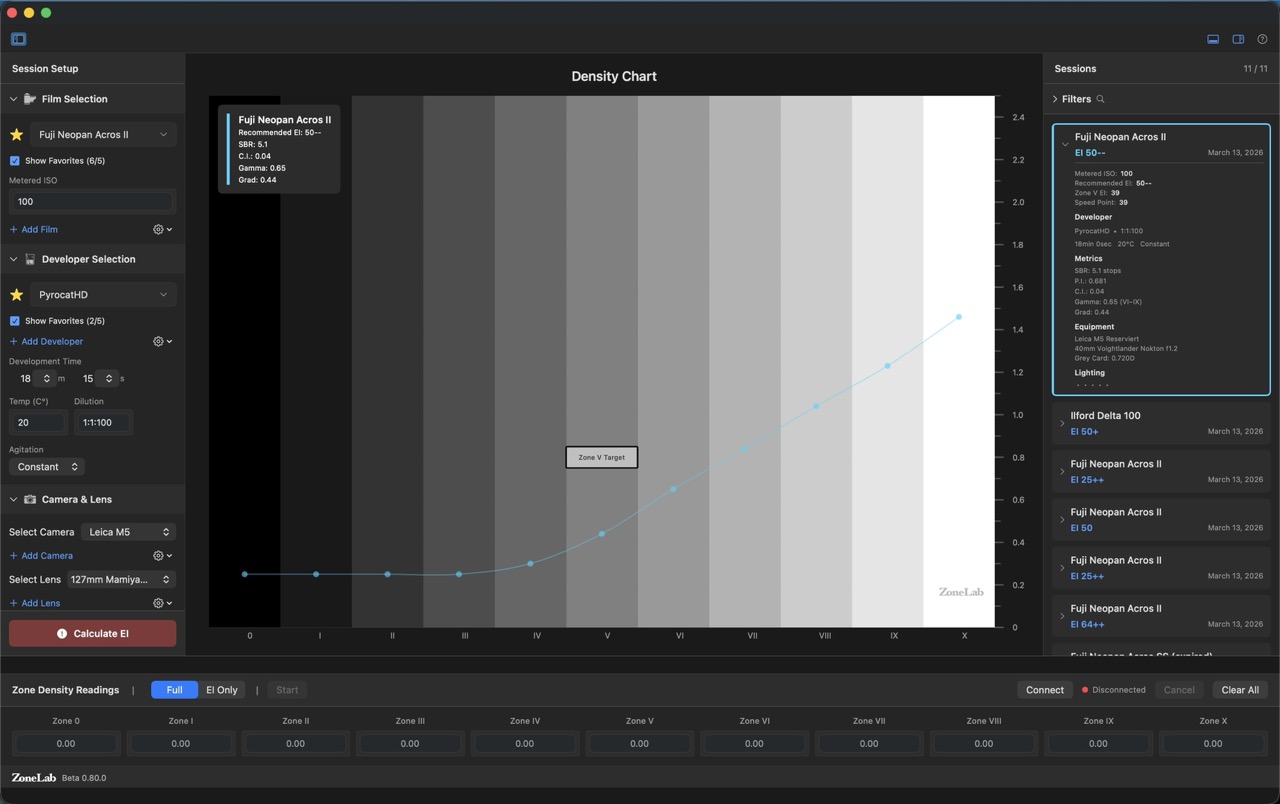
- 1 The collapsed row shows film name, developer, and the Recommended EI (with standard ISO rounding and +/– precision indicator).
- 2 Click the disclosure triangle to expand the full metrics: Metered ISO, Recommended EI, Zone V EI, Speed Point EI, CI, Gamma, Gradient, Tonal Range, and Exposure Latitude.
- 3 Development parameters (developer, temperature, time, dilution, agitation) are shown at a glance so you can immediately understand what process produced this curve.
- 4 The Edit button (pencil icon) opens the Edit Session dialog for that session without having to select it first.
What to Compare (Change One Variable at a Time):
- Same film, different developers → isolate developer's effect on contrast
- Same developer, different times/temperatures → isolate development variable impact
- Different films, same developer → isolate film characteristic differences
- Different cameras/lenses, same film/developer → identify equipment-specific exposure variations
Scientific Approach: Changing multiple variables simultaneously makes it impossible to know what caused a difference. Control your variables by keeping everything constant except the one thing you're testing.
Filtering Sessions
Use the filter controls in the Session Library to show only specific sessions:
- Filter by film (e.g., show only Tri-X tests)
- Filter by developer (e.g., show only D-76 tests)
- Filter by camera or lens
- Combine filters for precise results
Reordering Sessions
Drag and drop sessions in the Session Library to reorder them. This can help group related tests together.
Editing Session Information
After calculating a session, you can edit its metadata and parameters without having to re-enter all the zone readings.
What You Can Edit
To edit a session, select it in the Session Library and click the "Edit" button (or double-click the session). You can modify:
Equipment Changes:
- Film: Change the film stock used
- Developer: Update developer type and development parameters
- Camera: Change which camera body was used
- Lens: Update which lens was used
- Filter: Add or change B&W filter used (Yellow #8, Orange #21, Red #25, etc.)
- Grey Card: Change the reference grey card
Session Details:
- Lighting Conditions: Add or update lighting information
- Session Notes: Add or edit notes about the test (up to 500 characters)
- Zone Readings: Correct any density measurements if needed
When to Edit Sessions
- Correction: Fix data entry errors without re-entering everything
- Additional Information: Add notes or lighting details you forgot initially
- Metadata Update: Correct equipment selections if you documented the wrong camera or lens
- Zone Reading Adjustments: Update density values if you re-measured more accurately
Note: When you edit zone readings, click "Calculate EI" again to update the results with the new data. The metrics (Effective ISO, CI, Gamma, Tonal Range, Exposure Latitude) will be recalculated automatically.
Tip: You cannot change the testing mode (Full vs EI Only) after a session is created. If you need to switch modes, create a new session.
Data Management
Save Chart as PNG
File → Save Chart as PNG… (⌘⇧P)
Export the current density chart as a high-resolution PNG image — useful for sharing results, printing, or archiving alongside your session data.
- 1 The export renders whatever sessions are currently selected on the chart — select 1–5 sessions first, then export.
- 2 Speed point markers (◆ diamond for Speed Point EI, ▲ triangle for Zone V EI) are always visible in the exported PNG regardless of hover state.
- 3 A session legend below the chart shows each session's film name, developer, and Recommended EI with a matching color swatch.
- 4 Files are saved as
ZoneLab_Chart_M.D.YYYY.pngby default. A save dialog lets you choose a custom name and location.
CSV Export
File → Export Sessions (⌘E)
- Exports all session data to a CSV file with 37+ columns
- Includes all metadata: films, developers, cameras, lenses, filters, grey cards, settings
- Includes filter specifications: Wratten numbers, filter factors, stop compensation
- Includes lighting conditions and session notes
- Includes all zone readings and calculated results
- Perfect for backup or analysis in spreadsheet applications
CSV Import
File → Import Sessions (⌘I)
- Import previously exported session data
- Automatically creates missing films, developers, cameras, lenses, filters, and grey cards
- Preserves all zone readings, metrics, notes, and settings
- Useful for transferring data between Macs or restoring backups
Data Storage
All data is stored locally on your Mac in a Core Data database:
~/Library/Containers/app.zonelab.ZoneLabApp/Data/Library/Application Support/
ZoneLab never transmits data over the internet. Everything stays on your device.
Clearing Data
Two options are available in the Edit menu:
Clear Session Data
- Deletes all test sessions and zone readings
- Preserves your equipment libraries (films, developers, cameras, lenses)
- Use when you want fresh test data but keep your equipment setup
Clear All Data
- Complete factory reset - deletes everything
- Removes sessions and all equipment libraries
- Use when starting completely fresh
Warning: Both operations require confirmation and cannot be undone. Always export your data first!
Understanding Results
The Value of Systematic Testing: ZoneLab's metrics are most useful when compared across multiple sessions with controlled variables. A single test tells you one data point. Multiple tests with systematic changes (different developers, times, temperatures) help you understand cause-and-effect relationships in your process. Track patterns over time to build confidence in your workflow.
Important Note on Units: One stop of exposure equals 0.30 log-H units. However, the density change per stop depends on your film's gradient (CI or Gamma). You cannot assume a fixed density-to-stop relationship.
Effective ISO (EI - Exposure Index)
Available in: Full Mode and EI Only Mode
The ISO your specific process produces, determined by where 18% grey (0.72 density) falls in your exposure range. This is what you should set your light meter to when using that exact combination of film and process.
Terminology Note: In Zone System and film testing literature, ISO refers to the film's rated/box speed (e.g., "Kodak TMax 400"), while EI (Exposure Index) refers to the tested effective speed (e.g., "rated at EI 320"). ZoneLab displays calculated values as "EI" in the session list for clarity.
Formula:
Effective ISO = Metered ISO × 2^(stops difference)

Where:
- Metered ISO = the ISO you set on your meter when shooting the test
- Stops difference = (target zone - actual zone)
- Target zone = 5 (Zone V, where grey card should fall)
- Actual zone = the zone that measured closest to 0.72D
Example:
- Metered at: ISO 400 (what you set on your light meter)
- Shot grey card as: Zone V (base exposure)
- After development, Zone V measured: 1.05D (too dense)
- Zone measuring 0.72D (target): Zone III
- Stops difference: 5 - 3 = +2 stops
- Effective ISO: 400 × 2² = 400 × 4 = 1600
This means your film/developer combination is 2 stops faster than box speed. You were effectively shooting at ISO 1600 when you thought you were at ISO 400. Next time, meter at ISO 1600.
Contrast Index (CI)
Available in: Full Mode only
Measures the practical gradient over a useful exposure range (Zones II through IX). Higher CI values indicate more contrast. Use CI to compare how different developers affect your film's contrast rendering.
Formula:
CI = (Density at Zone IX - Density at Zone II) / (Log Exposure Range)

Where:
- Log Exposure Range = 7 zones × 0.30 log H = 2.10 log H
- Each zone = 1 stop = 0.30 log H units

Simplified formula:
CI = (D_IX - D_II) / 2.10
Interpretation:
- CI < 0.50: Low contrast (longer development needed)
- CI = 0.50-0.65: Normal contrast (N development)
- CI = 0.65-0.80: High contrast (shorter development or dilution needed)
- CI > 0.80: Very high contrast (reduce development significantly)
Typical targets:
- CI = 0.56: Kodak film data sheet recommendation for general development
- CI = 0.58: Kodak recommendation for diffusion enlarger printing
- CI = 0.43: Kodak recommendation for condenser enlarger printing
Note on Density vs. Stops: While one stop of exposure always equals 0.30 log-H units, the resulting density change depends on the film's gradient. This demonstrates why you cannot assume a fixed density-to-stop relationship: it varies based on your film's contrast characteristics.
Gamma (γ)
Available in: Full Mode only
Measures the slope of the straight-line portion of the characteristic curve. Related to CI but measured over the central linear portion only (Zones III-VIII). Higher gamma = steeper curve = more contrast.
Formula:
γ = (Density at Zone VIII - Density at Zone III) / (Log Exposure Range)

Where:
- Log Exposure Range = 5 zones × 0.30 log H = 1.50 log H

Simplified formula:
γ = (D_VIII - D_III) / 1.50
Interpretation:
- γ < 0.65: Soft/flat curve
- γ = 0.65-0.80: Normal gradient
- γ > 0.80: Contrasty/steep curve
Note: Gamma is more sensitive to development than CI because it measures only the straight-line portion.
Gradient (G)
Available in: Full Mode only
Measures the average gradient over the working range. Used to calculate gradient-adjusted density per stop for more accurate Effective ISO calculations.
Formula:
Gradient = (Density at Zone VIII - Density at Zone II) / (Log Exposure Range)

Where:
- Log Exposure Range = 6 zones × 0.30 log H = 1.80 log H
- Working range spans Zones II through VIII

Simplified formula:
G = (D_VIII - D_II) / 1.80
Interpretation:
- G = 0.57: "Normal" gradient (Lambrecht's target)
- G < 0.57: Lower contrast → less density change per stop
- G > 0.57: Higher contrast → more density change per stop
Impact on Effective ISO:
ZoneLab uses gradient to adjust the density-per-stop factor in EI calculations:
Density per Stop = 0.30 × (Gradient / 0.57)

Example with high-contrast film (G = 0.68):
- Density per Stop = 0.30 × (0.68 / 0.57) = 0.358
- Higher gradient → more density change per stop
- Results in more accurate EI calculation
Why This Matters: The traditional assumption of "0.30 density per stop" is only accurate at normal gradient (0.57). High-contrast films (e.g., TMax in Rodinal) or low-contrast films deviate from this. Gradient adjustment provides more accurate EI calculations across different film/developer combinations.
Tonal Range
Available in: Full Mode only
The total density difference your film can capture, measured from base + fog to maximum density.
Formula:
Tonal Range = Density at Zone X - Density at Zone 0

Where:
- Zone 0 = base + fog (unexposed film)
- Zone X = maximum exposure (+5 stops from grey card)
Interpretation:
- < 1.6D: Limited dynamic range
- 1.6-2.2D: Normal range (most films)
- > 2.2D: Extended range (high-capacity films)
Exposure Latitude (Stops)
Available in: Full Mode only
How much exposure error your process can tolerate while still producing usable negatives. Calculated from tonal range. Higher latitude = more forgiving film.
Formula:
Latitude (stops) = Tonal Range / 0.30

Where:
- 0.30 = density change per stop in the straight-line portion
Example:
- Tonal Range: 1.8D
- Latitude: 1.8 / 0.30 = 6 stops
Note: This is a simplified estimation. Actual usable latitude depends on printing requirements and desired tonal separation.
References
- Johnson, Chris. The Practical Zone System for Film and Digital Photography: Classic Tool, Universal Applications. Routledge, 6th Edition, 2017.
- Ryer, Alexander D. The Light Measurement Handbook. International Light Technologies, 1997.
- Conrad, Jeff. Exposure Metering: Relating Subject Lighting to Film Exposure. Large Format Photography Info.
- Kodak. Basic Photographic Sensitometry Workbook. Eastman Kodak Company.
- Lambrecht, Ralph. Way Beyond Monochrome. Focal Press.
Dual Speed Point System
What is the Dual Speed System? ZoneLab calculates two independent film speed ratings using different methods: Speed Point EI (toe-based) and Zone V EI (midtone-based). The Recommended EI uses the more conservative of the two to ensure proper exposure across your entire tonal range.
Understanding the Two Speed Methods
◆ Speed Point EI (B+F + 0.1 Method)
Speed Point EI is calculated based on where minimum useful density appears on your film:
- Target: Base + Fog + 0.10 density should fall at Zone I (0.3 logH)
- Philosophy: Conservative approach that ensures shadow detail is captured
- Best for: High-contrast scenes where shadow detail is critical
- Visual indicator: ◆ Diamond marker on the characteristic curve chart
▲ Zone V EI (Zone V Method)
Zone V EI is calculated based on where your grey card exposure falls:
- Target: 18% grey card should produce 0.72 density and fall at Zone V (1.5 logH)
- Philosophy: Standard exposure index that optimizes midtone rendering
- Best for: General photography with balanced tonal distribution
- Visual indicator: ▲ Triangle marker on the characteristic curve chart
Recommended EI (Conservative Approach)
ZoneLab recommends using the slower (more conservative) of the two calculated speeds:
- Formula: Recommended EI = min(Speed Point EI, Zone V EI)
- Why conservative? Ensures both shadows and midtones are properly exposed
- Example: If Speed Point EI = 250 and Zone V EI = 320, use 250
- Result: Slightly denser negatives with better shadow detail preservation
Standard ISO Rounding with +/- Indicators
ZoneLab displays your Recommended EI rounded to the nearest standard ISO value with precision indicators:
Standard ISO Values:
3, 6, 12, 25, 50, 64, 100, 125, 160, 200, 250, 320, 400, 640, 800, 1000, 1250, 1600, 3200, 6400
Precision Indicators (1/3 Stop Increments):
| Calculated EI | Displayed As | Meaning |
|---|---|---|
| 640 | 640 | Exactly matches standard ISO (no suffix needed) |
| 780 | 800- | Slightly below 800 (~0.1 stop) |
| 812 | 800+ | Slightly above 800 (~0.1 stop) |
| 890 | 800++ | Moderately above 800 (~0.2 stop) |
| 720 | 800-- | Moderately below 800 (~0.2 stop) |
Practical Use: Set your camera/meter to the displayed standard ISO value. The +/- indicators tell you how precise your exposure will be. For most work, being within one +/- of a standard ISO is perfectly acceptable.
Visual Indicators on Chart
When you hover over a session in the chart, you'll see speed point indicators overlaid on the characteristic curve:
- ◆ Diamond: Shows where the Speed Point EI falls on your curve (B+F + 0.1 density location — shadow toe)
- ▲ Triangle: Shows where the Zone V EI falls on your curve (0.72 density midtone target)
- White Outlines: Both markers have 2px white strokes for visibility against any background
- Chart Info Box: Upper left overlay shows film name, Recommended EI, and key metrics in white text
Session Detail Display
When you expand a session (click the twirl-down arrow), you'll see comprehensive speed information:
- Metered ISO: The ISO you set on your light meter when shooting the test
- Recommended EI: The calculated recommended exposure index (with standard ISO rounding and +/– indicator)
- Zone V EI: Zone V method result — where your grey card exposure fell (actual calculated value)
- Speed Point EI: B+F + 0.1 method result — where minimum useful shadow density falls (actual calculated value)
Example: Interpreting Dual Speed Results
Your Test Results:
- Film: Kodak Tri-X 400
- Developer: D-76 1+1, 7min 30sec @ 20°C
- Metered ISO: 400 (box speed)
ZoneLab Calculates:
- Speed Point EI: 250 (conservative, toe-based)
- Zone V EI: 320 (standard, midtone-based)
- Recommended EI: 250 (minimum of the two)
- Display: "Recommended EI: 250"
What This Means:
- Your process produces effective speed of EI 250, not the box speed of 400
- You're getting denser negatives (about 2/3 stop slower than box speed)
- Next Time: Set your meter to ISO 250 when shooting this film/developer combo
- Result: Properly exposed negatives with good shadow detail
Example: When Shadow and Primary Differ Significantly
Your Test Results:
- Film: Kodak TMax-100
- Developer: Rodinal 1+50, 10min @ 20°C (high contrast developer)
- Metered ISO: 100 (box speed)
ZoneLab Calculates:
- Speed Point EI: 64 (very conservative due to steep toe)
- Zone V EI: 100 (matches box speed for midtones)
- Recommended EI: 64 (minimum of the two)
- Display: "Recommended EI: 64"
What This Means:
- High-contrast development creates steep toe (rapid density falloff in shadows)
- Midtones are fine at box speed, but shadows need more exposure
- Using Speed Point EI (64) ensures shadow detail isn't lost
- Trade-off: Denser negatives overall, but better shadow separation
- Alternative: Reduce development contrast (lower dilution, shorter time) to bring Speed Point EI and Zone V EI closer together
When to Use Which Speed:
- Recommended EI (default): Best for general use — ensures both shadows and midtones are properly exposed
- Zone V EI only: If you're printing on high-grade paper (Grade 4–5) and can tolerate blocked shadows in exchange for optimal midtone placement
- Speed Point EI only: Rarely necessary — Recommended EI already uses Speed Point EI when it's the more conservative value
Most users should follow the Recommended EI. It represents the safest, most conservative approach that works across a wide variety of subjects.
Updating Speed Points for Existing Sessions
Sessions created before v1.0 may not have speed point data. To populate speed points:
- Select Edit → Recalculate All Metrics from the menu
- ZoneLab will recalculate Speed Point EI and Zone V EI for all existing sessions
- Speed point markers (◆ diamond and ▲ triangle) will appear on the chart when hovering over sessions
- Expanded session rows will show all four speed values: Metered ISO, Recommended EI, Zone V EI, Speed Point EI
Keyboard Shortcuts
| Action | Shortcut |
|---|---|
| Getting Started Guide | ⌘ ? |
| Save Chart as PNG | ⌘ ⇧ P |
| Export Sessions to CSV | ⌘ E |
| Import Sessions from CSV | ⌘ I |
| Toggle Tool Panels (Left Sidebar) | ⌘ ⌥ L |
| Toggle Session Library (Right Sidebar) | ⌘ ⌥ R |
| Toggle Printalyzer Densitometer | ⌘ ⇧ D |
| Densitometer Settings | ⌘ ⌥ D |
Troubleshooting
Calculate EI button is disabled
Solution: Hover over the Calculate EI button to see what information is missing. Common issues:
- Missing film, developer, camera, lens, or grey card selection
- In Full Mode: Not all 11 zone readings entered
- In EI Only Mode: Zone V reading not entered
- Invalid density values (must be numbers)
Data not saving
- Check that you have write permissions in
~/Library/Containers/ - Try restarting the app
- Export your data, use "Clear All Data", then import if issues persist
CSV import fails
- Ensure the CSV file was exported from ZoneLab
- Check that the file has the correct format (33+ columns)
- Verify the file is not corrupted or modified
Densitometer not connecting
- Ensure USB cable is properly connected
- Check that "Use Printalyzer Densitometer" is enabled (⌘⇧D)
- Try unplugging and reconnecting the device
- Check Densitometer Settings (⌘⌥D) for correct port selection
Wrong effective ISO calculated
- Verify density measurements are accurate (calibrated densitometer)
- Check that you metered the grey card correctly during shooting
- Ensure consistent lighting during test exposure
- Verify development parameters were followed precisely
- Remember: Different films with the same ISO rating may produce different effective ISO values based on curve characteristics
Fill Sample Data doesn't work in EI Only Mode
Solution: This is expected behavior. In EI Only Mode, Fill Sample Data only populates Zone V (not all 11 zones).
Need Help?
For additional support, bug reports, or feature requests:
- Email: info@zonelab.app
- Support: Visit the support page
- Privacy Policy: Read our privacy policy